In the world of 3D computer graphics, we often take for granted the rules of our reality. Parallel lines never meet, the angles of a triangle always sum to 180 degrees, and space extends infinitely in straight lines. This is Euclidean geometry, the foundation upon which most 3D engines, including Three.js, are built. But what if we could break these rules? What if we could create digital worlds that curve and distort in ways that defy our everyday intuition? This is the realm of non-Euclidean geometry, a mind-bending concept that can be brought to life on the web using the power of custom GLSL shaders.
This article dives deep into one fascinating technique for achieving this effect: rendering a 3D scene as if it were the surface of a 4D hypersphere. We’ll explore the theory behind 4D stereographic projection and provide a step-by-step guide to implementing a “curved space” shader in Three.js. This technique opens up a universe of creative possibilities for interactive art, immersive data visualizations, and unique game mechanics. While we focus on Three.js, it’s worth noting in the broader context of Three.js News and Babylon.js News that both leading WebGL libraries provide the necessary tools for low-level GPU programming through custom shaders, enabling developers to push the boundaries of real-time rendering.
Understanding the Core Concepts of Curved Space
To bend the rules of space, we first need to understand them. Standard 3D rendering uses a pipeline that transforms vertices from model space to world space, then to view space, and finally to clip space using a series of matrix multiplications. This process is linear and preserves the fundamental properties of Euclidean geometry. To create a curved effect, we need to intercept this process and apply a non-linear transformation, which is where shaders come in.
From 3D Space to a 4D Hypersphere
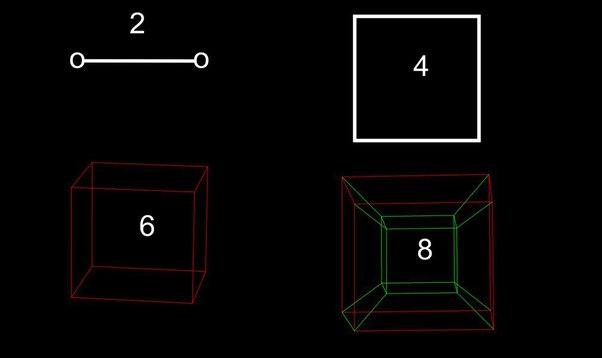
Imagine the 2D surface of a globe. To an ant walking on it, the world appears flat over short distances, but over long distances, the curvature becomes apparent. We can conceptualize our 3D world in a similar way, as the “surface” of a 4D sphere, often called a 3-sphere or hypersphere. In this model, what we perceive as straight lines are actually great circles on this 4D sphere. Moving through this space would feel like the world is constantly folding in on itself from the periphery, a truly surreal effect.
The Magic of Stereographic Projection
How do we represent this 4D concept on our 2D screens? The key is a mathematical technique called stereographic projection. In its simpler 3D-to-2D form, it’s a way of mapping points from the surface of a sphere onto a plane. Imagine a sphere sitting on a plane with a light source at its north pole. The shadow cast by any point on the sphere onto the plane is its stereographic projection.
We can extend this to 4D. We’ll treat our 3D scene as a slice of 4D space and project it from a 4D viewpoint (the “north pole” of our hypersphere) onto a 3D “plane” (the space our camera can see). This non-linear projection is what creates the signature distortion, where objects appear smaller and curved towards the edges of the view. This entire calculation will be performed in a vertex shader, which is a program that runs on the GPU for every single vertex in our scene.
Building the Foundation: A Basic Three.js Scene
Before we can bend space, we need to create it. This involves setting up a standard Three.js scene. Modern web development workflows, often powered by tools discussed in Vite News or Webpack News, make setting up such a project straightforward. For this example, we’ll use vanilla JavaScript, but the principles are identical when integrating into frameworks like those covered in React News or Vue.js News.
Scene and ShaderMaterial Setup
First, we need a scene, camera, renderer, and an object to view. A `PlaneGeometry` with many subdivisions is an excellent choice as it makes the curvature effect very obvious. The crucial part is using a `ShaderMaterial`, which allows us to supply our own custom GLSL code.
Here is a complete setup for a basic scene that uses a placeholder `ShaderMaterial`. This code establishes the foundation upon which we’ll build our effect.
import * as THREE from 'three';

// 1. Scene Setup
const scene = new THREE.Scene();
const camera = new THREE.PerspectiveCamera(75, window.innerWidth / window.innerHeight, 0.1, 1000);
const renderer = new THREE.WebGLRenderer({ antialias: true });
renderer.setSize(window.innerWidth, window.innerHeight);
document.body.appendChild(renderer.domElement);

// 2. Custom Shader Material
const shaderUniforms = {
    time: { value: 0.0 },
    // We'll add a 'w' coordinate for our 4D camera position
    cameraW: { value: 1.0 }
};

const vertexShader = `
    // Vertex shader code will go here
    void main() {
        gl_Position = projectionMatrix * modelViewMatrix * vec4(position, 1.0);
    }
`;

const fragmentShader = `
    // Fragment shader code will go here
    void main() {
        gl_FragColor = vec4(1.0, 1.0, 1.0, 1.0);
    }
`;

const curvedSpaceMaterial = new THREE.ShaderMaterial({
    uniforms: shaderUniforms,
    vertexShader: vertexShader,
    fragmentShader: fragmentShader,
    wireframe: true // Wireframe helps visualize the distortion
});

// 3. Geometry
// A highly subdivided plane shows the effect well
const geometry = new THREE.PlaneGeometry(10, 10, 50, 50);
const mesh = new THREE.Mesh(geometry, curvedSpaceMaterial);
scene.add(mesh);

camera.position.z = 5;

// 4. Render Loop
function animate() {
    requestAnimationFrame(animate);

    // Update uniforms for dynamic effects
    shaderUniforms.time.value += 0.01;

    renderer.render(scene, camera);
}

animate();

// Handle window resizing
window.addEventListener('resize', () => {
    camera.aspect = window.innerWidth / window.innerHeight;
    camera.updateProjectionMatrix();
    renderer.setSize(window.innerWidth, window.innerHeight);
});
At this point, you’ll see a simple white wireframe plane. The real work happens when we replace the placeholder GLSL code with our 4D projection logic. This setup is highly portable and can be encapsulated within components in projects using Angular News, Svelte News, or even emerging frameworks like SolidJS News.
Bending Vertices: The GLSL Implementation
The core of the curved space effect lies entirely within the vertex shader. This small program is executed in parallel on the GPU for every vertex of our geometry, allowing us to manipulate its final position on the screen. The use of strong typing in languages like GLSL mirrors trends seen in the wider development world, as highlighted by ongoing TypeScript News.
The 4D Stereographic Projection Vertex Shader
We will now replace the placeholder vertex shader with one that performs the projection. The logic is as follows:
- Take the incoming 3D vertex position (`position`).
- Create a 4D vector from it, with `w` set to 0. This places our geometry on the “equator” of the 4D hypersphere.
- Define a 4D camera/viewpoint position. We’ll place it at `(0, 0, 0, cameraW)`, where `cameraW` is a uniform we can control from JavaScript. This is our projection point.
- Calculate the vector from our 4D vertex to the 4D camera.
- Perform the stereographic projection math: scale the vector so its `w` component becomes -1, effectively projecting it onto the 3D “plane” at `w = -1`.
- Use the resulting `x, y, z` coordinates as the new position for the vertex.
This GLSL code implements the logic described above.
uniform float time;
uniform float cameraW; // The 'w' coordinate of our 4D camera

varying vec3 v_position;

void main() {
    // 1. Define our 4D camera position.
    // We can move this 'w' value to travel "through" the 4th dimension.
    vec4 camera_pos_4D = vec4(0.0, 0.0, 0.0, cameraW);

    // 2. Treat the object's vertex position as a point in 4D space (with w=0).
    vec4 pos_4D = vec4(position, 0.0);

    // 3. Perform the stereographic projection.
    // This is the core of the effect.
    float scale = 1.0 / (camera_pos_4D.w - pos_4D.w);
    vec3 projected_pos_3D = (pos_4D.xyz - camera_pos_4D.xyz) * scale;

    // 4. Pass the transformed position to the standard rendering pipeline.
    gl_Position = projectionMatrix * modelViewMatrix * vec4(projected_pos_3D, 1.0);

    // Pass the transformed position to the fragment shader for coloring
    v_position = projected_pos_3D;
}
A Simple Fragment Shader
The fragment shader determines the color of each pixel. For now, we can create a simple gradient effect based on the transformed vertex position to help visualize the curvature. The `varying vec3 v_position;` line in both shaders allows us to pass the calculated `projected_pos_3D` from the vertex stage to the fragment stage.
varying vec3 v_position;

void main() {
    // Create a simple color based on the transformed vertex position
    float color_val = length(v_position.xy) * 0.2;
    gl_FragColor = vec4(color_val, 0.5 * color_val, 1.0 - color_val, 1.0);
}
By plugging these shaders into the `ShaderMaterial` from the previous step, you will immediately see the effect: the grid will appear to bend away from the center, as if stretched over a sphere. The entire ecosystem of modern web development, from server frameworks discussed in Node.js News and Deno News to build tools like those in Turbopack News, supports this kind of advanced client-side rendering.
Advanced Techniques and Best Practices
Creating the initial effect is just the beginning. To make it truly compelling and performant, several other factors must be considered. This is where we move from a simple demo to a robust implementation suitable for production environments, which might be part of a larger application built with Next.js News or Nuxt.js News.
The Challenge of Lighting and Normals
A major pitfall of this technique is that standard 3D lighting breaks. Three.js calculates lighting based on vertex normals, which are vectors that define the orientation of a surface. Since we are drastically warping the vertex positions, the original normals are no longer correct for the new, curved surface. Recalculating normals for a non-Euclidean space is mathematically complex. For many artistic applications, it’s often better to “fake” lighting:
- Matcaps: Use a Material-Capture texture, which encodes lighting information directly into the texture. This is a very fast and effective technique that is independent of scene lights.
- Custom Lighting in Shader: Calculate a simple lighting value directly in the fragment shader based on the transformed position (e.g., make things brighter the closer they are to a certain point).
- Distance-based Fog: Add fog that is calculated based on the distance in the new, curved space to enhance the sense of depth.
Performance and Optimization
Shaders run on the GPU, but they are not free. The mathematical operations in our vertex shader are executed for every vertex, every frame.
- Vertex Count: The primary performance driver is the number of vertices in your scene. Use geometries with just enough detail to show the curvature smoothly, but no more. Techniques like Level of Detail (LOD) can be invaluable here.
- Shader Complexity: Keep your shader math as simple as possible. Avoid complex loops or conditional statements if they can be replaced with simpler arithmetic.
- Professional Workflow: In a real-world project, maintaining code quality is key. Using tools highlighted in ESLint News for linting, Prettier News for formatting, and robust testing frameworks like those in Jest News or Cypress News ensures your JavaScript/TypeScript codebase remains stable and maintainable.
Adding User Interaction
The effect becomes truly interactive when the user can control it. The most impactful parameter is our `cameraW` uniform. By changing its value over time, we create the illusion of traveling through the 4th dimension. We can hook this up to the mouse wheel or keyboard input inside our `animate` loop.
// In your JavaScript, add an event listener
let targetW = 1.0;
window.addEventListener('wheel', (event) => {
    // Increase or decrease the target 'w' value based on scroll direction
    targetW += event.deltaY * -0.001;
    // Clamp the value to prevent extreme distortion
    targetW = Math.max(0.2, Math.min(targetW, 5.0));
});

// Inside the animate() loop
function animate() {
    requestAnimationFrame(animate);

    // Smoothly interpolate the current 'w' value towards the target
    let currentW = curvedSpaceMaterial.uniforms.cameraW.value;
    curvedSpaceMaterial.uniforms.cameraW.value += (targetW - currentW) * 0.05;

    renderer.render(scene, camera);
}
This snippet adds a smooth, interactive “zoom” through the 4th dimension, making the experience far more engaging.
Conclusion: The Next Dimension of Web Graphics
We’ve journeyed from the familiar rules of Euclidean space into the mind-bending world of non-Euclidean geometry, all within a web browser. By leveraging the power of Three.js and custom GLSL shaders, we’ve seen how to implement a curved space effect using 4D stereographic projection. The key takeaway is that the rendering pipeline is not a black box; vertex shaders give us direct control over the geometry of our world, allowing us to define our own rules of reality.
This technique is a powerful tool for any creative developer. The next steps are to experiment: apply the shader to more complex 3D models, explore different mathematical projections, or integrate the effect into a larger interactive experience or game. As web technologies continue to advance, the line between native and web-based graphics blurs, and mastering these advanced GPU techniques will be essential for creating the next generation of immersive digital content. The frontier of real-time web graphics is vast, and with tools like these, you are well-equipped to explore it.