
In the ever-evolving landscape of web development, the tools we use to build, bundle, and optimize our applications are in a constant state of flux. While newer, faster bundlers often capture the headlines, Webpack remains a dominant and incredibly powerful force. Its unparalleled flexibility, mature ecosystem, and battle-tested reliability make it the go-to choice for complex projects, from large-scale enterprise applications to intricate browser-based games. The latest Webpack News isn’t about replacing it, but about its continued integration into sophisticated project templates and modern development workflows.
Understanding Webpack is more than just learning a tool; it’s about grasping the fundamental principles of how modern JavaScript applications are constructed. It empowers developers to fine-tune every aspect of their build process, ensuring optimal performance, maintainability, and scalability. This article will take you on a comprehensive journey through Webpack, starting with its core concepts, moving through practical implementation for popular frameworks, exploring advanced optimization techniques, and concluding with best practices that will elevate your development skills. Whether you’re keeping up with React News, exploring the latest in Vue.js News, or building with a game engine, a solid understanding of Webpack is an invaluable asset.
Deconstructing Webpack: The Four Core Concepts
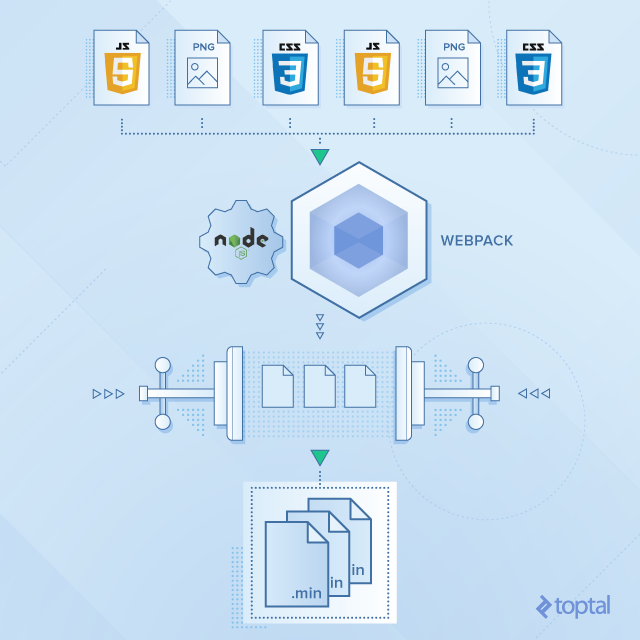
At its heart, Webpack is a static module bundler. It takes all your project’s assets—JavaScript files, CSS, images, fonts—and transforms them into a dependency graph. From this graph, it generates a small number of optimized bundles that a web browser can efficiently download and execute. To control this process, Webpack relies on four fundamental concepts that form the basis of its configuration.
1. Entry
The entry point is the starting point of the dependency graph. Webpack begins here to find all the modules and dependencies that it needs to bundle. By default, its value is ./src/index.js, but you can specify one or more entry points in your configuration file, webpack.config.js.
2. Output
The output property tells Webpack where to emit the bundles it creates and how to name these files. The main output file is typically ./dist/main.js, but you can configure this to suit your project’s structure. The path property defines the directory, and filename defines the name of the output file.
3. Loaders
Out of the box, Webpack only understands JavaScript and JSON files. Loaders are what allow Webpack to process other types of files and convert them into valid modules that can be consumed by your application and added to the dependency graph. For example, babel-loader transpiles modern JavaScript (ES6+) into browser-compatible ES5, and css-loader allows you to import CSS files directly into your JavaScript modules. Staying current with Babel News and TypeScript News is key to configuring these loaders correctly.
4. Plugins
While loaders work on a per-file basis during the bundling process, plugins are more powerful and can hook into the entire compilation lifecycle. They can perform a wide range of tasks, such as bundle optimization, asset management, and environment variable injection. A classic example is HtmlWebpackPlugin, which automatically generates an HTML file and injects your bundled JavaScript into it.
Here is a basic webpack.config.js that illustrates these four concepts:

const path = require('path');
const HtmlWebpackPlugin = require('html-webpack-plugin');

module.exports = {
  // 1. Entry
  entry: './src/index.js',

  // 2. Output
  output: {
    path: path.resolve(__dirname, 'dist'),
    filename: 'bundle.js',
  },

  // 3. Loaders
  module: {
    rules: [
      {
        test: /\.js$/, // Apply this rule to .js files
        exclude: /node_modules/,
        use: {
          loader: 'babel-loader', // Use babel-loader
        },
      },
      {
        test: /\.css$/, // Apply this rule to .css files
        use: ['style-loader', 'css-loader'], // Use style-loader and css-loader
      },
    ],
  },

  // 4. Plugins
  plugins: [
    new HtmlWebpackPlugin({
      template: './src/index.html', // Use this html file as a template
    }),
  ],
};
Practical Implementation: Building a Modern Application
Theory is essential, but the true power of Webpack becomes apparent when you apply it to a real-world project. Let’s walk through setting up a simple project using React and TypeScript, a common stack in today’s development world. This process highlights how Webpack orchestrates various tools to create a seamless development experience, a topic often seen in Vite News and Turbopack News as well, though with different approaches.
Setting Up a React and TypeScript Project
First, you’ll need to install the necessary dependencies: Webpack itself, React, TypeScript, and the specific loaders and plugins for this stack.
# Core Webpack and server
npm install webpack webpack-cli webpack-dev-server --save-dev

# React dependencies
npm install react react-dom --save

# Babel for transpiling JSX
npm install @babel/core @babel/preset-env @babel/preset-react babel-loader --save-dev

# TypeScript and its loader
npm install typescript ts-loader --save-dev

# CSS Loaders and HTML plugin
npm install style-loader css-loader html-webpack-plugin --save-dev
With these packages installed, we can create a more sophisticated webpack.config.js. This configuration will handle .ts and .tsx files using ts-loader and then transpile JSX using babel-loader. It’s a common pattern to chain loaders to process files in multiple steps.
const path = require('path');
const HtmlWebpackPlugin = require('html-webpack-plugin');

module.exports = {
  mode: 'development', // Set mode to development for better debugging
  entry: './src/index.tsx', // Entry point is now a TypeScript file
  output: {
    path: path.resolve(__dirname, 'dist'),
    filename: 'bundle.js',
  },
  module: {
    rules: [
      {
        // Process both .ts and .tsx files
        test: /\.(ts|tsx)$/,
        exclude: /node_modules/,
        use: 'ts-loader', // Use ts-loader for TypeScript
      },
      {
        // Process .js and .jsx files for compatibility
        test: /\.(js|jsx)$/,
        exclude: /node_modules/,
        use: {
          loader: 'babel-loader',
          options: {
            presets: ['@babel/preset-env', '@babel/preset-react'],
          },
        },
      },
      {
        test: /\.css$/,
        use: ['style-loader', 'css-loader'],
      },
    ],
  },
  // Resolve file extensions
  resolve: {
    extensions: ['.tsx', '.ts', '.js', '.jsx'],
  },
  plugins: [
    new HtmlWebpackPlugin({
      template: './public/index.html',
    }),
  ],
  devServer: {
    static: {
      directory: path.join(__dirname, 'dist'),
    },
    compress: true,
    port: 3000,
  },
};
This configuration demonstrates Webpack’s role as an orchestrator. It seamlessly integrates TypeScript and Babel, enabling developers to write modern, type-safe React code. This level of control is crucial for projects that might follow trends in Next.js News or Svelte News, where specific build configurations are key to performance. The same principles apply to game development, where recent Phaser News highlights the importance of robust bundler templates for managing complex assets and codebases.
Advanced Techniques for Performance and Scalability
Once you’ve mastered the basics, Webpack offers a suite of advanced features to optimize your application for production. These techniques are critical for reducing load times, improving user experience, and managing large, complex codebases.
Code Splitting and Dynamic Imports
By default, Webpack bundles all your code into a single file. For large applications, this can result in a massive bundle that takes a long time to download and parse. Code splitting is the technique of splitting your code into various bundles which can then be loaded on demand or in parallel. The most common way to achieve this is with dynamic import() syntax.
When Webpack encounters an import() statement, it automatically creates a separate chunk for that module. This is particularly useful for route-based splitting in single-page applications.
Consider a React component that loads a heavy charting library only when the user clicks a button:
import React, { useState, lazy, Suspense } from 'react';

// Use React.lazy for component-level dynamic imports
const HeavyChartComponent = lazy(() => import('./HeavyChartComponent'));

function App() {
  const [showChart, setShowChart] = useState(false);

  return (
    <div>
      <h1>My Dashboard</h1>
      <button onClick={() => setShowChart(true)}>Load Chart</button>
      {showChart && (
        <Suspense fallback={<div>Loading...</div>}>
          <HeavyChartComponent />
        </Suspense>
      )}
    </div>
  );
}

export default App;
In this example, the code for HeavyChartComponent will not be included in the initial bundle. It will be fetched from the server only when the user clicks the “Load Chart” button, significantly improving the initial page load time. This is a core optimization strategy discussed in Angular News and is fundamental to frameworks like Remix, as covered in Remix News.
Tree Shaking
Tree shaking is the process of eliminating dead code (unused exports) from your final bundle. Webpack performs tree shaking automatically in production mode (mode: 'production') for ES2015 modules. For it to work effectively, you must ensure you are using import and export statements and avoid side effects in your modules. This is a crucial feature for reducing bundle size, especially when using large libraries like those often featured in Three.js News or when managing dependencies in a large Node.js News-worthy backend project.
Module Federation
A revolutionary feature introduced in Webpack 5, Module Federation allows multiple separate builds to form a single application. These separate builds can be developed and deployed independently, yet share dependencies and expose/consume code between them as if they were a single, monolithic application. This is a game-changer for micro-frontend architectures, enabling teams to work autonomously on different parts of an application without sacrificing integration. It’s a powerful concept that goes beyond what many other bundlers, often mentioned in Rollup News or Parcel News, currently offer.
Best Practices and Optimization Strategies
Configuring Webpack correctly is key to a fast and efficient build process. Following best practices ensures your development experience is smooth and your production builds are as small and fast as possible.
Development vs. Production Builds
Always maintain separate configurations for development and production.
- Development: Focus on fast rebuilds and powerful debugging tools. Use
devtool: 'eval-source-map'for accurate source maps and leveragewebpack-dev-serverfor hot module replacement (HMR). - Production: Focus on creating small, optimized bundles. Set
mode: 'production'to enable optimizations like minification, tree shaking, and scope hoisting. Use tools likeTerserWebpackPluginfor advanced minification andMiniCssExtractPluginto extract CSS into separate files.
Bundle Analysis

You can’t optimize what you can’t measure. Use a tool like webpack-bundle-analyzer to generate a visual representation of your bundle’s contents. This plugin helps you identify large dependencies or duplicated modules that are bloating your bundle size. This analytical approach is vital for performance-critical applications, whether you’re building a desktop app with Electron (see Electron News) or a mobile app with Capacitor (relevant to Capacitor News).
Caching
Leverage browser caching by using content hashes in your output filenames. By setting output.filename to something like '[name].[contenthash].js', Webpack will generate a unique filename every time the content of a file changes. This allows you to set long-term caching headers on your server, as the browser will only need to download files when their content, and thus their filename, has actually changed.
Staying Updated
The JavaScript ecosystem moves quickly. Keep an eye on the latest ESLint News and Prettier News to ensure your code quality tools are integrated into your build process. Similarly, monitor developments in testing frameworks like Jest and Cypress (Jest News, Cypress News) to see how they can be better integrated with your Webpack setup for a robust CI/CD pipeline.
Conclusion: The Enduring Power of Webpack
In a world filled with exciting new tools, Webpack stands as a testament to the power of maturity, flexibility, and a vast community-driven ecosystem. While bundlers like Vite have revolutionized the development experience with near-instantaneous hot module replacement, Webpack’s comprehensive control over every minute detail of the build process remains unmatched for complex, production-grade applications.
Mastering Webpack is an investment that pays dividends across any project you undertake. It provides the foundation for building highly optimized, scalable, and maintainable applications, whether you’re working with mainstream frameworks like React and Vue, exploring niche libraries like Svelte or SolidJS, or pushing the boundaries of web technology with game engines like Phaser. By understanding its core concepts and applying advanced optimization techniques, you equip yourself with a powerful skill set that is essential for any serious web developer in 2024 and beyond.